The
Laser Guide Swing Training System:
Now that we have
dissected the individual contributions of the shoulders (rotation), and the
hands and arms (vertical lift), I will use this section to facilitate further
understanding of these movements and to show how to incorporate these movements
into one smooth swing. To do this, I will present The Laser Guide Swing
Training System, a swing training system and visualization that has become an
indispensable part of my golf game. I’ve found that this concept can be used as
a tool to ensure the correct movements. I came across this idea when I taped a
small flashlight to the end of a clubshaft to see where it was pointing at
certain phases of the swing; I then made associations between this idea, the
concept of swing plane, and the knowledge of several sound positions during the
swing.
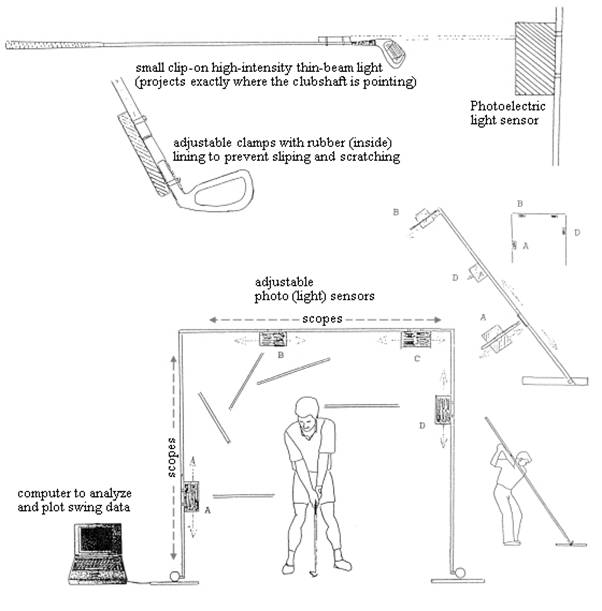
The Laser Guide Swing Training System (see
figures 11 and 12) is an invention specifically designed to give visual
references and feedback for club positions, during the swing. We project where
the clubshaft is pointing by attaching a high-intensity penlight, or laser, to
the base of the shaft near the clubhead. We swing the club inside of an
adjustable arc/plane that has a system of light sensors set in desirable club
positions during the swing. When the light is on these sensors, a tone is
emitted that serves as instant feedback indicating that the club is in the
desirable position. The goal is to achieve these positions in a fundamentally
sound manner.
Arc and swing plane are concepts that
describe the combined rotational and vertical motion of the golf swing. The
correct blending of the shoulder turn, and the hand/arm movements, bring the
club into positions that describe a smooth arc and a distinctive plane. You can
learn a sound swing, by concentrating on the attainment of certain positions
and by practicing the incorporation of these positions into one smooth swing.
Previous sections have revealed which muscles to use, and this device has been
designed to give visual/spacial references so you can see and feel exactly how
to lift and rotate the club during the swing.
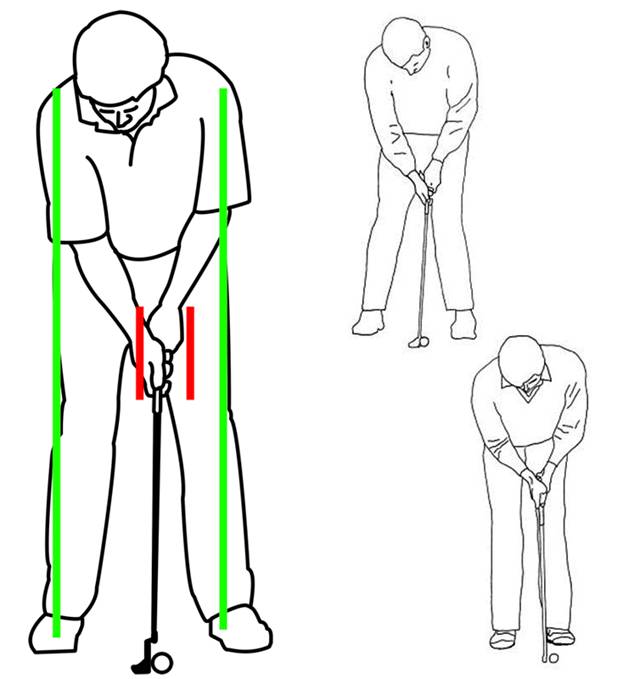
Ben Hogan popularized the swing plane
concept. Accordingly, a plane that is drawn from the ball line through the
mid-point of the shoulders represents the ideal plane. During the backswing, we
swing the club along this plane when the club and arms are approximately at
hip-level. Many call this position "toe in the air is square," and it
is represented by the first sensor on the Laser Guide arc (sensor A in figure
11). By lifting and turning the club to this position, you will achieve a
square, and on-plane position, for the first part of the backswing. The idea is
to swing the club so that the shaft is pointing at the sensor, and thus in a
position that is parallel to the target line. Many golf instructors use the
swing thought, “turn and shake hands with someone who is directly behind you,”
to achieve this position.
The next step is to move the club
gradually from this "toe in the air is square" position into the
correct position at the top of the swing. At the top, the clubshaft should be
pointing at the last sensor (sensor D in figure 11) in a position known as
"parallel at the top"; here, the clubshaft should be pointing toward
the target along a line that is parallel to the target line. The goal is to
learn to properly turn and lift the club so that it gradually, and smoothly,
goes from "toe in the air is square" to "parallel at the
top." There are sensors between these positions that make this transition
easier. By studying this arc and visualizing its use, you can learn to swing the club into sound positions and
thus learn a sound golf swing. You should understand that the shoulders, hands,
and arms place the club into these positions, and this device gives
references—in space—to coordinate these movements.
Once you thoroughly understand the
positions of these sensors, this visualization can be used to work on swing
rhythm. By attempting to activate these sensors for a longer interval of time,
you can slow down the swing and thus gain more control. If there are problems
with a smooth transition at the top (e.g., "coming over at the top"),
you can visualize this system and work on pointing the club at the top sensor
for a longer interval of time; this will allow the hips and lower body time to
start the downswing, before the hands and arms have the opportunity to do so.
Imagine that you want the tone to last for a longer interval of time.
An additional way to train with The Laser
Guide visualization, is to practice hitting the positions in slow motion.
Recent research shows that complex movements such as the golf swing, which are
composed of a series of smaller movements, can have an incorrect segment
“clipped out” and replaced with the correct movement by practicing it in slow motion.
This correct sequence of movements is then stored in the cerebellum, and motor
centers of the brain, and can be called forth to produce a correct swing at
normal speed on the golf course. This is analogous to putting together a film,
frame by frame, and then seeing the desired result when playing it at full
speed. Practicing in slow motion, builds “muscle memory”—which is really brain,
or cerebellum, memory.
Many will argue that all swings are
different, and that the Laser Guide concept is ridiculous. Some people take the
club inside, others take the club outside, and there are a number of good
players with unorthodox styles. However, the Laser Guide concept has been
designed to help one to understand and learn the sound positions of a good golf
swing, and as a means to attain the highest levels of consistency. It was
designed to allow one to swing the club so that it is in a “square” position,
throughout the swing. Even with this system, we can expect some deviation in
swing positions due to body type and the degree of wristcock. A person with a
high degree of wristcock will tend to point the clubshaft above the sensors,
and someone with very little wristcock will tend to point the shaft below the
sensors.
Summary
of steps to keep in mind when visualizing the Laser Guide Swing Training
System:
1.) Keep spine angle straight; swing
around the "central axis."
2.) Use the "inside
muscles"; stay on the insides of feet.
3.) Back with the feet and legs.
4.) Turn the shoulders back with the
rotator cuff muscles.
5.)
Take the club back with “the left-arm focal point”; the right forearm cocks up
and folds against the right side.
6.) Activate the sensors; activate the
top one longer.
7.)
After shifting the weight and moving the left hip to the left as the initial
movements of the downswing, turn the shoulders through with the rotator cuff
muscles.
Figure 11— Illustrations of
The Laser Guide Swing Training System, a device for teaching and practicing the
proper golf swing by giving visual references, and feedback, for club positions
during the swing. The golfer uses a club that has an attached high-intensity
penlight that projects where the clubshaft is pointing. One swings the club
inside of an adjustable arc/plane that has a system of light sensors set in
desirable club positions during the swing. When the light is on these sensors,
a tone is emitted that serves as instant feedback indicating that the club is
in the desirable position. The tone can be used for “swing rhythm” and
“transitional training” (at the top of the swing). Thus, this device allows one
to see references of swing positions, and to incorporate these positions into a
full, smooth, swing.
Figure
12—
Additional illustrations of The Laser Guide Swing Training System. The drawings illustrate the concept of “plane.”
Here, the “arc” is set up to run from the ball line (target line) through the
mid-point of the shoulders. The photo/light sensors can be adjusted to take the
club either “inside,” or “outside,” depending upon the desired shot
configuration.
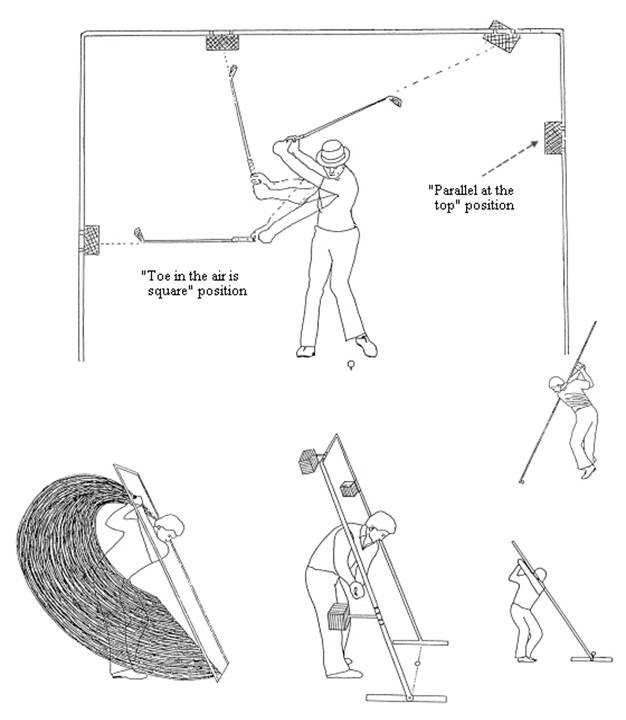
Figure 12a— Additional illustrations of The
Laser Guide Swing Training System. The illustrations represent reference
points, such as “toe in the air is square” and “in the slot at the top. This
visualizations give ones a means to achieve the perfect plane and thus a means
to gain the highest level of consistency that one can possibly achieve.
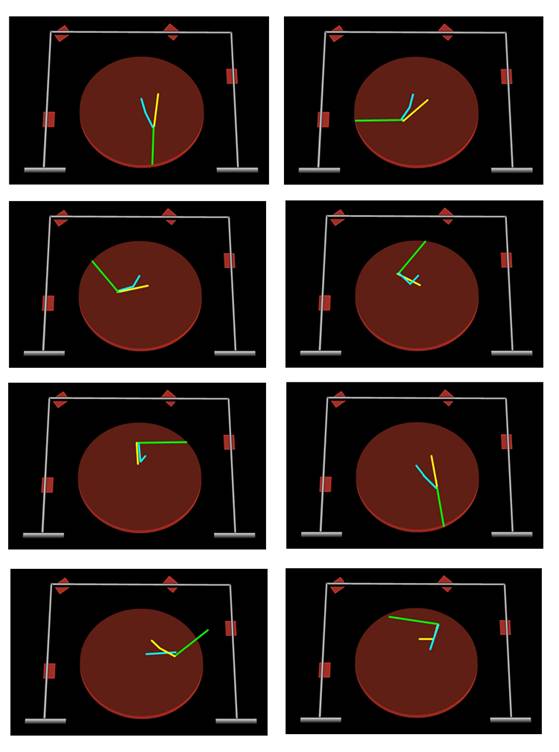
Figure 13—
Illustrations of the path of the clubhead as it swings away from the ball. The
club goes away in a “one-piece” motion, in motion that is analogous to the
hinging of a door as it swings opened and closed.
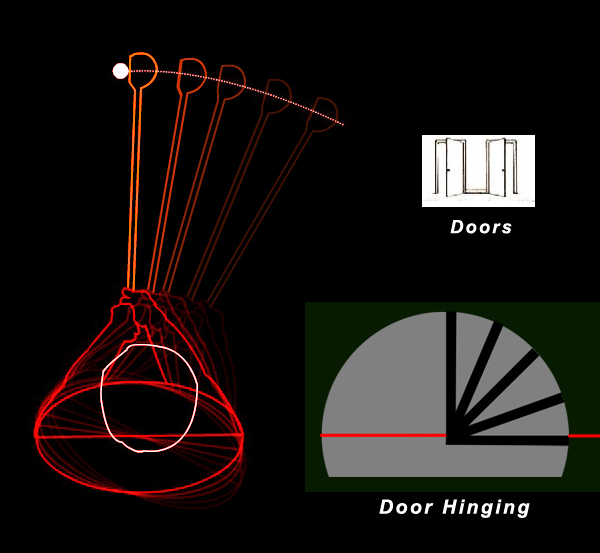
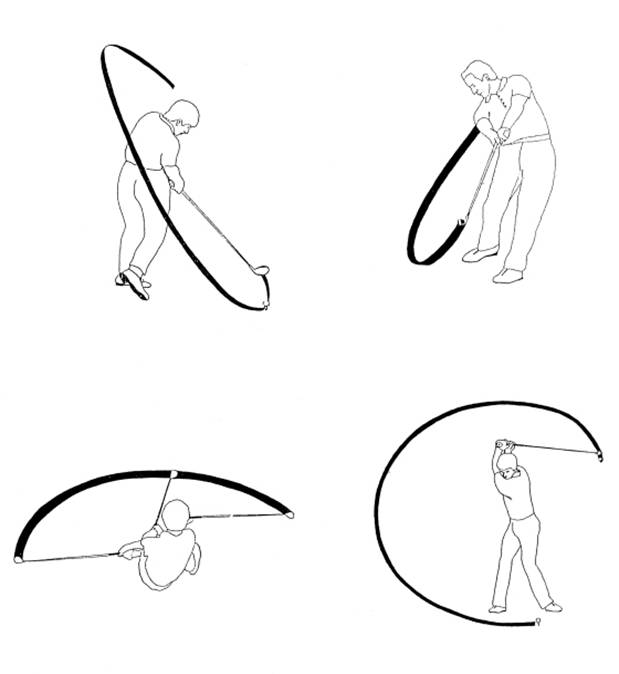
Figure 13a—
Illustrations of the swing arc, the circular-like path of the clubhead as it
swings up and around the body. The arc is more circular at the bottom, near the
ball, due to the fully- extended arms and wrists; conversely, the arc becomes elliptical as the clubhead nears the top of
the swing, due to the hinging of the wrists. Many golfers find it very
helpful to visualize the swing as a wheel that turns around the axis of the
spine. Visualization, and awareness, of this arc can help to increase accuracy
and distance control.
How the Club Starts
Back:
►Johnny Miller:1.) Rock back of the
knees; 2.) “One piece.”
►Bobby Nichols: 1.) Low to the
ground; 2.) Hips and shoulders simultaneously.
►Julius Boros: 1.) Rebound; 2.)Turn shoulders; 3.) No
tension in arms; 4.) Left arm comfortably straight and in control.
►Gene Sarazen: 1.) No wrist break
and low to the ground; 2.) Hands lead the takeaway and “one piece”; 4.)
Shoulder lowers.
►Gary Wiren: 1.) Turn of the
shoulders and hips; 2.) Left arm remains in control.
►Nick Faldo: 1.) Torso; 2.)
Hands, arms, clubhead.
►Ernest Jones: 1.) Swing the club
with the hands; 2.) Rest of the body follows their lead; 3.) Shoulders and arms
should be regarded as admirable followers but disastrous as leaders.
►Jack Grout: 1.) Hands; 2.) Arms
triggers the shoulders.
►Ben Hogan: 1.) Hands; 2.)
Arms; 3.) Shoulders; 4.) Hips.
►Jimmy Ballard: 1.) Left Foot; 2.)
Left side; 3.) Triangle; 4.) Center.
►Bobby Jones: 1.) Left foot; 2.)
Trunk; 3.) Arms
►Sam Snead; 1.) Forward press;
2.) Hips and shoulders are in synch with the hand and arm swing.
►Patty Berg: 1.) Hands and arms
go away low; 2.) Body turns.
►Jack Nicklaus: 1.) Press; 2.)
Clubhead; 3.) Hands and arms; 4.) Left shoulder pushes.
►Gary Player: 1.) Low and no
wrist break; 2.) Shoulders turn freely.
►Tony Lema: 1.) Low; 2.)
Clubhead goes back straight for 1 foot; 3.) Left arm; 4.) Body turns like a
hub.
►Greg Norman: 1.) Extension; 2.)
Right pocket back; 3.) Knees maintain same angle and position; 4.) Shoulders
turn on same plane as hips.
►Curtis Strange: 1.) One-piece with
no wrist break; 2.) Slow.
►Bill Rogers: 1.) Low; 2.)
Square.
►Gardner
Dickinson:
1.) Low along line; 2.) Full extension.
►John Jacobs: 1.) No independent
movement of the hands, forearms, or wrists from the body turn.
►Dick Aultman: 1.) Swing the club
back with the arms as the weight rebounds to the right foot.
►Harry Cooper: 1.) Initiate the
swing with the feet.
►Frank Beard: 1.) Everything
(hips, arms, shoulders, and hands) at the same time.
The Follow-through:
The swing arc is a concept that describes the
circular-like path of the clubhead as it swings around the body. We can use
this concept to ensure accuracy and consistency, by becoming aware of, and
visualizing, the clubhead traveling along this smooth arc during each swing. To
ensure a smooth and consistent arc, some professionals visualize a wheel that
turns around the central axis (the spine). Professionals have such great
control of the ball because they have learned to consistently produce the same
arc. Essentially, the objective of the set-up is to learn how to place the body
so that the ball will fall on, and near the bottom of, this arc. Following the
correct swing arc allows a number of the grooves on the clubface to come into
contact with the ball, which imparts the backspin that is necessary to stop the
ball quickly. (There’s no trick to backspin—it’s just the result of clubhead
speed and a sound golf swing.)
Learning to feel the clubhead swing up the
backswing arc, and down the downswing arc, is one further step toward swing
mastery. It is especially important to feel the clubhead on this arc as it
passes through the hitting area, because it ensures the proper body turn and
footwork. Also, you can safeguard against swinging the club too quickly, by
making a conscious effort to feel the clubhead as it goes up the backswing arc.
Visualization of the swing arc can also
greatly aid the golfer who encounters problems with distance control. Often
times, golfers “air mail” the green because they drive the arc forward, through
the hitting area, which adds extra distance to the shot. By making a conscious
effort to produce the same consistent arc for each club, you maximize your
chances of hitting each club a consistent distance.
Putting
It All Together:
To summarize, I have presented a swing
training system that has been designed to go beyond the problems of existing
swing training systems. My goal was to present a fresh juxtaposition of ideas
with a coherent, orderly, and simplistic structure, that would allow one to
produce a swing with the highest degree of reliability, and
reproducibility. To do this, I trimmed
away the unnecessary swing thoughts that “clutter-up” the mind, concentrated
many swing variables into four sequential foci— the use of the legs, shoulders,
and the left and right arms—and added several visualizations (e.g. The Laser
Guide) that tied together everything into a smooth, mechanically-sound, and
repeating golf swing. By using these swing thoughts that are comprised of many
swing variables, we gain a degree of control that goes beyond that possible
with traditional swing training systems, and swing schemes. In essence, we have
a technology designed to produce lower scores, and a higher degree of
consistency.
The procedures for The Redemptive Golf
System are the following: First, you must be cognizant of the set-up positions,
including ball positions, grip, and the correct position of all parts of the
body. Second, focus on “the triad”: The left-arm action, the right-arm action,
and the rotator cuff action. Third, focus on leg action and weight transfer.
Fourth, once the leg action begins, perform the actions of “the triad.” Fifth,
at the completion of the backswing, shift the weight, move the left hip, and
hit through the ball with the rotator cuff-action. These procedures are a
sequential shift of foci that ensure the consistent execution of a sound golf
swing.
It’s essential to make sure that these
movements blend together to produce a fluid and consistent swing.
Over-controlling these movements can result in tense muscles and, thus, a jerky
and undesirable swing. Research reveals that the best results come when skill
memories are only consciously recalled during the early phases of the swing,
and the latter phases are more reflexive, or automatic, in nature. As with most
complex movements, or actions, long practice and many repetitions are necessary
before one can consistently blend these movements as desired.
The main objective is to become so
familiar with the integral parts of this system that the entire system becomes
a single thought which will elicit a 2 to 3-second symphony of sound movements.
In actuality, it’s not possible to fire all of these individual thoughts and to
make compensations for all of the individual movements in the short interval of
time that it takes to swing the golf club. However, this system gets around
these physical limitations because it literally programs the brain, ahead of
time, to execute the correct sequence of movements. We are applying the
principles that allow a superconductor computer chip to perform complex
operations in a nanosecond (10-9 s), or hundreds of millions of
operations in a mere second—the complex neural networks of your brain can be
programmed to reproduce a perfect golf swing, in much the same manner that
enables the fastest and most reliable superconductor computer chips to perform
their operations. You can store the perfect swing in your brain, and then just
activate it at will on the golf course! By extensively working with the parts
of this system on the range, in slow motion training, and by becoming cognizant
and practicing these movements during the practice swing, we can guarantee the
execution of the correct movements on the golf course. We can avert being
paralyzed by worrying about all of the details, and put very little thought
into the actual execution of the swing, because the details have already been
programmed into your “muscle memory.”
The brain stores memories, such as complex
movements, by setting up circuits called cell assemblies, or neural nets. These
circuits are the result of alterations at the neural synapse, which affects the
firing rate between neurons. When individual neurons are activated—for example,
during the course of performing a complex task—the synaptic connections are
strengthened by increasing the number of packets of neural transmitter that the
nerve cells will release when next activated. With many of these strengthening
activations, we get temporary assemblages of cells (a circuit) with high
excitability, which is the basis of short-term memory. These assemblages of
neurons (a neural pathway), if traversed over and over again like a well-worn
footpath, will transform these temporary electrochemical changes into
long-lasting anatomical changes. In essence, a neural pathway is formed because
neural messages tend to flow along paths of least resistance, which result from
the extended use of that particular pathway.
This system ingrains the complex movements
of a sound golf swing into the brain, by strengthening and setting up neural
pathways which elicit the correct sequence of movements. These pathways will be
traversed because they will be the pathways of least resistance. Like a
player-piano that can be programmed to play perfectly any piece of music, you
can program yourself to execute perfectly the golf swing. With our current
technology, this system has been designed to allow a high degree of
certainty—and confidence—before one even swings the golf club!
Short
Shots:
To complete the arsenal, you need to
master several types of short shots around the green. In contrast to the longer
irons and woods, which are more rotary in character, the short iron swings are
more vertical (up and down) due to the shorter shaft and the golfer standing
closer to the ball.
Some players do not have a system, or
method, to produce certain types of short shots. As a result, they experience many
misplayed shots and also avoid shots that would give more opportunities to
score. These golfers can lower their scores and adapt to play a variety of
different courses, by learning the techniques, and swing schemes, to play the
short shots.
The following are four shots that every
golfer should learn: 1.) A high pitch shot, that allows one to get over
bunkers, trees, water hazards, and other obstacles; 2.) A normal to low-flying
pitch shot, that allows one to score when unimpeded, in wind, and when playing
underneath trees and other obstacles; 3.) A chip shot to “get up and down” when
near the green; 4.) A low-running pitch-and-run shot. Proficiency with these
four types of shots will allow one to negotiate all types of golf courses.
You need to know how to hit a high pitch
shot because of the inevitably of being confronted with situations that have no
other option. There are pins tucked behind bunkers, or just past water hazards,
that require this type of shot. This is one of the most difficult shots in
golf, because it requires an open, or square, clubface that strikes the ball
near the bottom of the arc. This shot can be very difficult, and dangerous, if
the ball is not “sitting up” in a good lie.
There are four keys that will allow you to
consistently “pull off” the high pitch shot. First, the shot is mostly hands
and arms and should be played with an open stance; Second, get a “handsy” grip
by turning the left hand slightly to the right (clockwise) and weaken the right
hand some by gripping it more in the fingers and by turning it slightly to the
left; Third, “pivoting” around the left elbow (keep it in its same relative
position throughout the hitting area) will allow you to hit the ball with an
open, or square, clubface; this can also be achieved by making an effort to
keep the club handle pointing at the center of the chest, until after impact;
Fourth, a visualization, “see the happy face on the follow through,” will also
keep the clubface from closing at impact; this position is achieved if you can
completely see the clubface (the flat portion with the grooves) when turning
the head to look at it as it goes up the arc on the followthrough (see figure
15). This visualization also ensures the supple hands and arms, through impact,
that are required for a high, soft, shot. The major point, here, is to make
sure that the clubface does not close down at impact. You may have different
kinesthetic sensations for each shot, but it is important to develop a
system—set-up positions, swing thoughts, and sensations—that will allow you to
consistently produce the desired shot. Tom Kite is so proficient at the short
game because he has a profound understanding of the swing mechanics for each
type of shot.
The chip shot is much easier to play than
the pitch shot. The goal with this type of shot is to eliminate hand action by
controlling the stroke with the shoulders. Also, you should place the hands in
front of the ball and make contact with a descending blow. The key is to take
the club back and through with the rotator cuff muscles, and to make a
conscious effort to keep the hands out of the stroke. Placing, and maintaining,
the hands further in front of the ball will result in a lower shot (see figure
16).
Figure 14—
Illustrations of pitching technique. By making an effort to pivot around the
left arm, the golfer also achieves the dynamics necessary to produce a high,
soft-landing, pitch shot. To achieve this swing thought, one should feel as if
they are pivoting around the left arm/elbow (it should feel as if it stays in
the same relative position), through the hitting area.
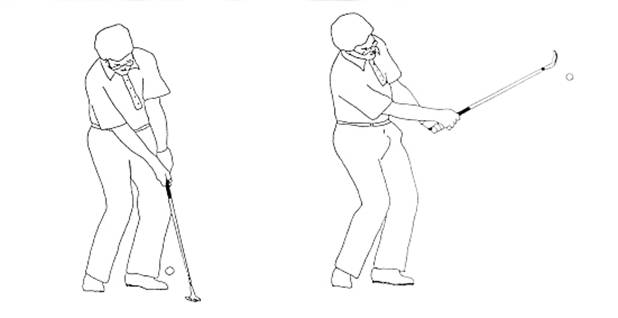
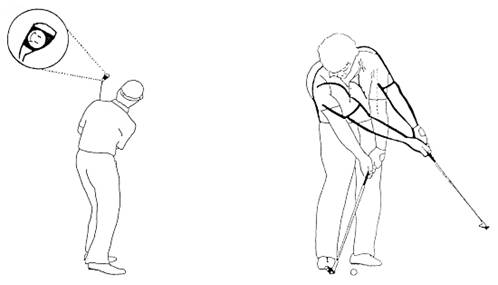
Figure 15— Illustration of “see the happy face.”
This visualization/concept ensures that the hands and arms remain supple and
that the clubface does not “close down” before, or through, impact; these are
the parameters that are necessary to produce a high pitch shot. To “see the
happy face,” the golfer imagines that a face has been painted on the clubface;
if the face is visible at the top of the follow through (if the golfer turns
and looks up at it when it is near the left ear), then the correct swing
dynamics (open clubface and subtle hands at impact) will have been achieved.
Figure 16— Illustrations of chipping technique.
To perform this shot, keep the hands in front of the clubhead, use the
“left-arm focal point,” and turn the rotator cuff muscles. By placing the hands
in front and hitting through with the rotator cuff muscles, one ensures a
consistent, low-running, shot with a large margin of safety.
The
Composite Putting System:
Many golf teachers describe the putting
stroke as a miniature version of the full swing. Just as with the complex
motion of the full swing, one must understand the mechanics and develop a system
to consistently produce a sound putting stroke. One may use a simplified image
(e.g., "straight back and toward the hole,” “low and slow”, and "on
line") and apply very little effort toward understanding the dynamics of a
good putting stroke, but the only way to ensure success is to put forth this
effort. This section will be divided into three parts—the set-up, how to make
the stroke, and a composite swing images for a compact stroke.
“A man who can’t putt is a match for no one, a
man who can is a match for anyone.”
Harvey Penick
Set-up.
Set-up principles are so important because
they allow one to get into the same correct positions each time. One must learn
to consistently make the same stroke, and getting into the same positions, at
set-up, are the first steps toward achieving this goal. Set-up fundamentals
strategically place the body, hands, and arms into positions to make an
“online” stroke—that is, these fundamentals allow you to consistently control
the putter face so that it is perpendicular, or “square”, to the line of the putt, at the moment of
contact with the ball (in face at all points during the stroke). Volumes of
material have been written on putting set-up fundamentals, and these are listed
repeatedly in most books and articles on the subject; many are listed, and
illustrated, in Figures 17 and 18. Some of the most important fundamentals are
the following:
1.)
You should bend over from the hips, and your
eyes should be either directly over the ball, or slightly inside of it.
2.)
The back of the hands should be square, or
perpendicular, to the line of the putt and place into a position where they
oppose one another. The wrists should be in a downward-arched position so that
the hands do not break down through the stroke. Tom Watson likes to feel like
he mainly uses the left arm to control the stroke.
3.)
The ball should be slightly ahead of the
center of the stance so as to give a good consistent roll to it.
4.)
Your head should always remain still, until
well after impact with the ball.
5.)
You should have a very quiet base (legs and
lower body), which is steady and stable, and remains in the same position
through the stroke.
6.)
The shoulders and feet should always be
parallel to the line of the putt.
7.)
The angle of the left arm should stay the
same throughout the stroke.
8.)
The shoulders, arms, hands and handle of the
clubhead should form a triangle and every effort should be made to maintain
that triangle throughout the stroke.
9.)
The blade, or face, of the putter should be
square to the target line throughout the stroke. All power to propel the ball forward
should come from the shoulders with the only function of the hands and arms
being to keep the clubhead in that square position.
10.)
You must accelerate through the putt, that
is, through contact with the ball.
11.)
You must keep a positive mindset and believe
that you are going to make the putt.
There
are many putting grips, but the standard is the “reverse overlap” where the forefinger
is wrapped over the 2 smallest fingers of the right (for a right-handed
golfer). This grip is superior to the Vardon-type grip, because it allows the
back of the hands, and palms to remain square to the line of the putt while not
“breaking down” at impact. Billy Casper, recognized as one of the greatest
putters of all time said the following about the reverse overlap putting grip:
“A grip is no use at
all unless it sets your hands on the shaft so that the back of the left hand,
the palm of the right and the blade of the putter are all square to the same
line, namely, the line to the hole. They should remain square throughout the
stroke. This is absolutely essential if you expect to maintain any consistency
in the direction of your putts. The advantage of the reverse overlap grip is
that it not only achieves this desirable squareness, but also cements the hands
together so well. With the left hand in a strong position on the shaft, but
with the forefinger of the left hand overlapping the fingers of the right,
neither hand can dominate the other to the extent of producing an uneven or
inaccurate stroke.” (Sports Illustrated,
February 20, 1961 My Secrets Of Putting Bill Casper, Gwilym Brown).
A very important putting set-up principal pertains
to the angles of the upper and lower arms. To achieve putting consistency you
must maintain the same elbow angles throughout the putting stroke. When you
allow the angles of the elbows to change during the stroke, you throw
consistency right out the window. Constant elbow angles allow you a constant
arc throughout the putting stroke. I often imagine that the bones of my wrists
and elbow area are broken, shattered, or held together by metal plates, and
that it would be very painful if I change their position during the stroke;
these images insure that I do not allow the elbow angle, or wrists, to break
down during the stroke. All of this sets the stage so that the shoulders will
completely control the stroke.
Two additional set-up concepts that
are very important in my set-up routine, pertain to the left and right-hand
positions. The left thumb (for a right-handed golfer) should be in the
“lifeline” of the right hand. The left wrist should be arched and the clubshaft
should be in line with a line that continues through the forearms. If you hold
the putter in the palm and do not arch the wrist, then it is possible that the
left wrist can “break down,” or change its position during the stroke. Also,
both thumbs should be on top of the shaft.
I make sure that the upper segments of the
fingers (the segment closest to the palm) lay flat against the side of the
putter grip and that the palm continues this flat plane. This puts the palm and
back of the right hand into positions that are parallel to the putterface.
These hand positions are very important in my stroke, because they allow
minimal hand action by placing the hands together in a complementary fashion
that promotes a perpendicular clubface (to the line of the putt) at impact.
Since putting is such an important part of
the game, it is very important to become aware of set-up positions and swing
thoughts that produce a consistent stroke. Through practice and experience on
the golf course, you can learn to focus on specific movements and feelings that
produce a consistent stroke. Nine-tenths of the battle is won by learning the
set-up positions and muscular sensations, and the rest is won by gaining the
confidence that comes when you experience success, “time after time.”
Part
B: How To Swing The Putter.
The goal in putting is to contact the ball
when the putterface is perpendicular to the line of the putt. The best putting
technique accomplishes this, more often, compared to other techniques.
Theoretically, the ideal putting stroke
would swing the putterhead back and forward along the line of the putt. Since
the putterface would always be “online” (perpendicular to the target), there
would be no chance of error from trying to get it back into this position at
impact.
In reality, we don’t want to use the
hands-and-arms method required to take the putterhead along the line of the
putt. The small, fast-twitch, muscles of the hands and arms make it too
difficult to consistently get the desired results. In general, the smaller muscles
contract faster and are much more difficult to direct during contraction. Also,
the large number of muscles in the hands and arms make it very difficult to
coordinate and repeat these movements.
If you watch some of the older golf films,
such as Shell’s Wonderful World of Golf, you will notice that most of
the golfers used a hands-and-arms putting technique. However, this technique is
not seen much anymore (except in the older players) because the
shoulder-controlled stroke has been accepted as much more reliable. Bob Charles
was one of the early professionals who proved the superiority of the
shoulder-controlled putting stroke.
As in the full swing, the rotator cuff
muscles are responsible for the shoulder turn during the putting stroke. You can
become a good putter by isolating the rotator cuff muscles and by learning to
take the putter back with them the same way for each stroke. By focusing down
to the anatomical level—visualizing the rotator cuff muscles swinging the
putter back and through—we eliminate a multitude of variables responsible for
inconsistent putting. Although the movements of the shoulders (rotator cuffs)
rotate the putterhead back and away from the line of the putt, the larger
rotator cuff muscles are much more reliable to deliver the putterhead back to
the desired impact position. Since there are fewer “working parts” with the
shoulder turn (each rotator cuff contains four muscles), there is a lower
probability that something will go wrong.
In the shoulder-controlled stroke, the
hands, wrists, and arms function only to maintain the putterhead (face) in a
“square position.” The force to hit the ball is solely the result of the
shoulder turn; the hands, wrists, and arms keep the clubhead from turning out
of position due to the centrifugal force that is generated by the shoulders. In
short, the hands, wrists, and arms function to maintain the same relative position to the body as at
address.
Part
C: The Altered-Putter Swing Image.
The final part of this putting system involves
the visualization of using an altered putter (see Figure 21). This putter is
identical to one’s regular putter, with the exception that approximately
one-half centimeter of metal is missing from the putter face on both sides of
the aiming line. The result is that a narrow strip, or island, has been left on
the original putter face to contact the ball. If the ball is not contacted
precisely on this strip, then it will careen either to the left, or right, of
the intended line. Practicing with this aid, and visualizing it when using
one's regular putter, results in great stability and precision at the bottom of
the stroke. Visualizing the use of this altered putter ensures that one drives
the ball toward the hole with the shoulders, prevents the hands from getting
into the stroke, and prevents the wrists from “breaking down.”
In conclusion, this putting system is
effective because it teaches one to use the correct muscles each time, and it
provides a visualization that adds great stability and precision to the stroke.
The following is the routine for each stroke: First, proper set-up is learned,
and employed, the same way each time. Second, consciously take the putter back
with both rotator cuff areas and make sure that the hands, wrists, and arms do
not get out of position. Finally, both rotator cuffs take the club back through
and make sure to contact the ball with the small strip on the clubface.
Figure 17— A simple
representation of sound putting set-up. Here, a line drawn across the top of
the forearms should be parallel to the intended line of the putt. A line drawn
through the hips should also be parallel to the intended line of the putt. Eyes
should be either directly over the ball, or slightly inside the line of the
putt.
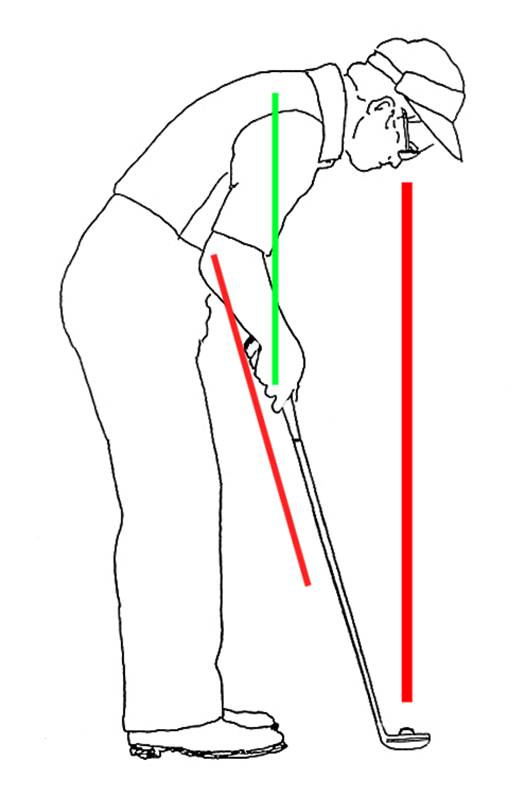
Figure 17a— A simple representation of sound putting set-up. Here, a
line drawn across the top of the forearms should be parallel to the intended
line of the putt. A line drawn through the hips should also be parallel to the
intended line of the putt. Eyes should be either directly over the ball, or
slightly inside the line of the putt. The hands are directly beneath the
shoulders. A line drawn extended from the shaft should pass through the hands
and forearms.
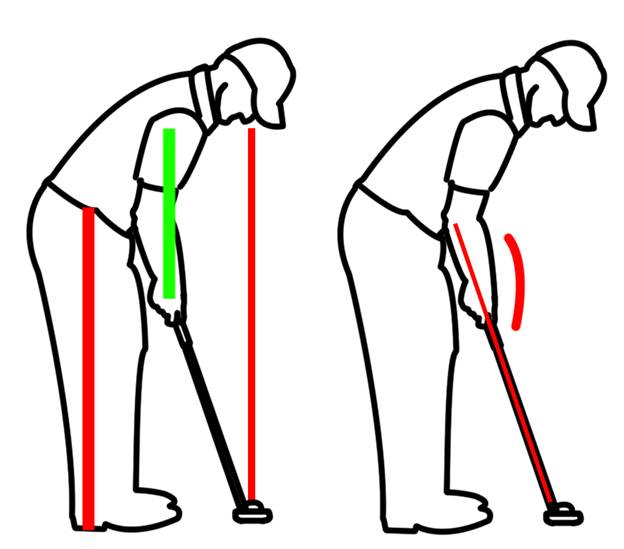
Figure 18—
Illustrations of the rotator cuff areas, and examples of set-up positions. Each
rotator cuff is composed of an anterior
(front) and a posterior (back) portion. With practice, a person can develop the
proper feel of taking the club back and through with these muscles, and will
learn to call upon them to control the club on the course. Individuals may
differ in their descriptions of the feelings of using these muscles, and each
should develop a memory technique to reproduce the stroke. For example, one
person may visualize taking the club back with their armpit areas, and another
may pinpoint other areas near each shoulder.